Most of us academic/industrial ECE/CS researchers want to make our results as reproducible as possible. Its good for the integrity of our field and it also helps future researchers and developers to build on our prior work. GitHub is great for distributing software, but code can rarely be compiled and run on its own as nearly all modern software relies heavily on packages and dependencies. Installing these dependencies can be incredibly frustrating or possibly even impossible depending on how long ago the code was written. Thankfully, Docker is here to save the day!
What benefits does Docker provide?
Running code or even product deployment without ever installing dependencies, enabling multiple dependency versions on a server without conflicts, “pulling” of environments from Docker Hub as simply and easily as cloning a GitHub repository, and all without noticeable performance degradation.
How does Docker provide all of this modularity and portability?
By very nearly being a Virtual Machine (VM) but not going the full way. See here for more details, but rather than implementing an entire OS as a VM might do, an instantiation of a Docker image (called a “Container”) only implements binaries, libraries, and applications. This makes running a Windows image on Linux or vice versa tricky since they don’t have the same kernel, but since most of the folks I know develop on Linux this hasn’t been a problem for me. In case you’re interested in running Docker on macOS or Windows check out this blog post.
From a practical standpoint, how do I use Docker?
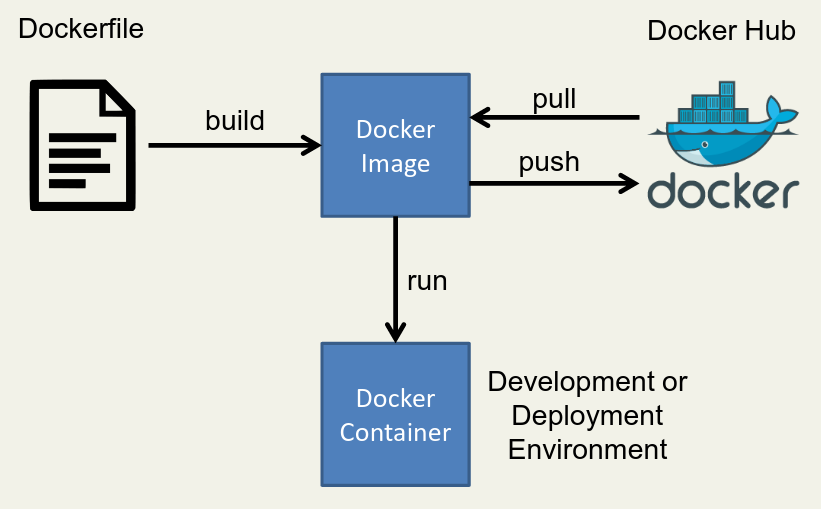
First, write an installation script for all of your dependencies. This script is written with Docker specific syntax and is called a Dockerfile. Then, run these commands to build a Docker image of your environment by using
docker build. Once successfully built, you can instantiate copies of this image as many times as you would like by usingdocker runto create Docker containers. It is in these containers that you will run or develop your code. If you would like other people to be able to use your Docker image you can push to DockerHub (withdocker push), and if you want to use someone else’s image you can pull from DockerHub (withdocker pull).How do I write a Dockerfile?
You can check out the full reference, but here is a simple example:
# Start with an existing Docker image to give yourself a head start
FROM ubuntu:14.04

# Change to a given directory
WORKDIR /root

# Run some shell commands to install dependencies
RUN apt-get update && apt-get upgrade && apt-get install -y \
    build-essential \
    git \
    etc...

# Clone and build code not available through your package manager
RUN git clone https://github.com/halide/Halide.git
WORKDIR /root/Halide
RUN make -j8

# Set any necessary environment variables
ENV LD_LIBRARY_PATH /root/Halide/bin:$LD_LIBRARY_PATH

# Lastly, set your workdir to be your default when starting the image
WORKDIR /root
How do I run a Docker image (create a docker container)?
First, pull the image you’d like to use or build one from a Dockerfile like the one shown above.
docker pull mbuckler/approx-visionThen, use the docker run command.
docker run \
-v <path to datasets>:/datasets \
-v <path to approx-vision>:/approx-vision \
-it mbuckler/approx-vision \
/bin/bash
In the example command above you see that I start with
docker run, and then create two docker volumes. These volumes allow me to interact with data outside of the docker container. Then I choose which image to run, and start myself off with a bash shell.What if I want to use my GPU from within a Docker container?
You’re in luck! NVIDIA provides nvidia-docker, a specific application for linking NVIDIA GPU’s and docker.
What if I want to use X forwarding from within a Docker container?
Skand Hurkat and I figured out a great way to do this. He’s posted the instructions here, but I’ll cross-post them here for completeness.
Include the X packages within your Docker image by adding these commands to your Dockerfile.
RUN apt-get update
RUN apt-get install -qqy x11-apps
Set the path to your
.Xauthorityfile. Your.Xauthorityfile will automatically be created in your home directory if using X11 forwarding on a server you’re accessing remotely, but if you’re using Docker on your local device then you’ll need to create the file with touch.XAUTH=$HOME/.Xauthority touch $XAUTHRun your Docker image. Use the host’s networking stack and connect both the display and Xauthority environment variables.
docker run --network=host --env DISPLAY=$DISPLAY -v $XAUTH:/root/.Xauthority -it <dockerimagename>
OK Docker fanboy, tell me the downsides…
For one, creating/pulling lots of Docker images can take up a lot of disk space. The real downside however is that Docker users have sudo privileges on the local machine when running containers. You can find a really excellent blog post about this here, but at the end of the day you have two choices:
Require that users invoke sudo when executing docker commands.
This isn’t super attractive since it makes usage less convenient, but it is the safest option.
Create and use a docker group.
With this option anyone who is in the docker group can run docker commands without sudo. This is the option I use, where I only add users to the docker group that I would consider adding to the sudo group. I also inform new users about the dangers, as you can do a lot of damage by mounting sensitive volumes.