
This is the third in a series of three posts teaching you how to DJ!
Part 1: What You Need to Start DJing
Part 2: How to Learn DJ Basics
Part 3: How to Make a DJ Mix
Alright, you’ve got your gear and you’ve practiced a few transitions. Now is the time to dig into the meat of DJing: creating your mix. Below I describe my personal method, but as I’ve mentioned before there are many ways to succeed. If you want to use Traktor instead of Rekordbox, ignore cue points completely, never organize your music, or anything else go ahead! Just make sure that you’re having fun and that you like the sound of your mix.
Also, if you get stuck at any point that’s OK! There are often ways to make things easier for yourself. For example, I often recommend that new DJs practice on House music since the clear repetitive beat is great for learning beat matching and the long intros and outros make mixing a bit easier. As another example, lets say you’re struggling to find songs with the right key and BPM. No worries! You can search around for more tracks on Beatport to expand your library, giving yourself more options.
Alright, lets get started!
Instructions for how to make a DJ mix!
Listen to and label new music you’ve added recently
Some people have an insanely good memory and can easily remember what songs they want to play for any given mood or genre. I am not that kind of person! For me, I find it very helpful to do a few small things whenever I load in new music that help me down the line. When creating a new mix or playing live I am often interested in finding tracks which fit a certain mood, are a certain genre, or even just only showing my absolute favorite tracks. While BPM and key are easy to filter by since they are automatically analyzed by Rekordbox, there is no feature for analyzing mood, genre, or your personal taste. This is where labeling and Rekordbox intelligent playlists come in.
Whenever I add new music into my library I will first analyze the tracks to get BPM and key, but then I will label each track. By labeling I mean that in Rekordbox I add labels in brackets in the comments of each track which describe the genre, mood, and anything else I might want to sort by later. I also rate the track from 0-5 stars. As an example, in the comments of one of my favorite songs called Kingslayer by Caster & Ironheart I’ve written: “[Dubstep], [Epic], [Orchestral]” and I’ve rated it 5 stars. When labeling a song I try to have at least one label for genre and mood respectively. Feel free to use whatever labels make sense for you!
To conveniently view all songs that you’ve labeled by any given mood or genre, you can create intelligent playlists in Rekordbox. Each new intelligent playlist you create will pull songs from your entire collection based on a few rules that you set. For example, I have an intelligent playlist labeled Dubstep which includes all tracks that contain the text “[Dubstep]” in their comments. This means that every time I add a new track and label it as Dubstep, it will automatically be added to this playlist. I’ve set up intelligent playlists for all of my favorite genres and moods, making it very easy for me to find what I need!
Decide on what you’d like to accomplish with this mix
The answers to the questions below should inform all other decisions you make in the rest of planning out your mix. Here your goal is to decide on what you are trying to create.
What experience would you like your audience to have? What is the general vibe you’re going for? Do you want people on the dance floor to just nod slightly, sway, shuffle, headbang, mosh, break the rail, etc? Is this a promotional recording? If so, what kinds of songs and transitions would the reviewer be looking for?
Will this set be in-person, on a livestream, or just Soundcloud? If live, consider what the DJs before and after you will be playing. Are you an opener or headliner? If on a livestream, give yourself opportunities in the mix to respond to comments, or be prepared to change what you play based on requests that come in.
What DJ skills would you like to use? If this is your first mix, maybe you’ll rely on simple fades. If you’ve been playing for a while, try to come up with a challenge or goal. Would you like to do mashups, use more of your controller’s performance features, use drop swaps, or mix genres in ambitious ways?
How long should the mix be? Standard set times include 15, 30, or 60 minutes. If you’re playing live then timing is very important.
Select your signpost songs
This is arguably the most important step of all: deciding on your main tracks. Consider all of the answers you gave to the questions above when making these decisions. Here the goal isn’t to choose all of the songs you will play, but instead to choose songs that you think are especially good. In the next step you will add songs to glue these together. I’ve provided a few suggestions below for guidance on how to select songs. To start, make a new Rekordbox playlist for your mix, and add tracks to the playlist when you decide you’d like to play them.
For your first track, choose a song that has an interesting introduction. Look for something dramatic and slow building. Avoid a song with extremely high energy or one that starts with a boring drum loop. If none of the tracks you’d like to play have interesting introductions, consider making it your own by adding in some kind of voice-over.
For your last track, be especially concious of who will be playing after you. If you are playing as support for a headlining DJ, consider slowly bringing down the energy a little bit at the end to give the crowd time to recover. If you are the headliner, try to have something really fun saved for the end like a new song you’ve made or at least an especially epic track.
For the tracks in between, there are many reasons to choose a specific song.
Songs that define the vibe you’re going for
Songs that you’ve recently added to your collection or are especially excited about
Songs that you think the audience will get excited by (classics, brand new music, EDM remixes of non-EDM songs)
Songs you’ve produced
Songs that you’ve identified are good for mashups or can be used to play with performance features.
Add some breaks in the action
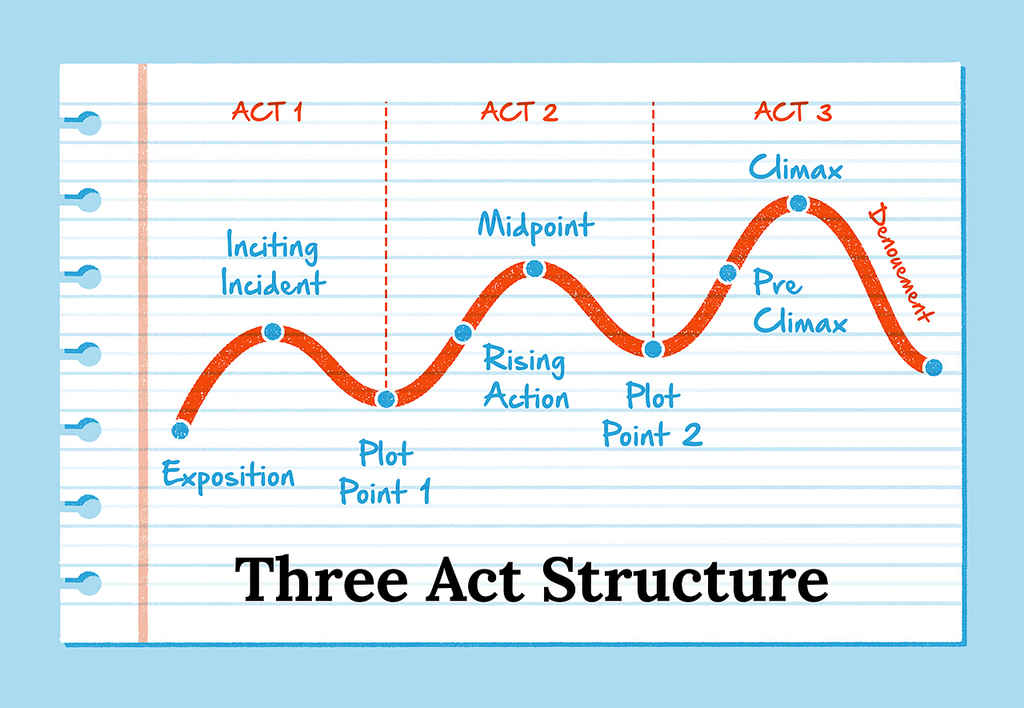
To me, choosing the songs to play in a mix is like a combination between writing a story and building a puzzle. Just like when writing a story, your goal should be to intentionally raise and lower tension by playing songs with certain energy levels at certain times. There are a few different ways to think about structuring a story, but I think the three act structure is especially helpful for this analogy. As you can see in the image below, each of the story’s three acts consist of rising tension and then releasing tension. Each subsequent act builds tension higher than the previous, resulting in a very captivating story. When selecting signpost songs most people immediately gravitate to the most exciting or highest energy songs they want to play, so now is the time to add in a few lower energy songs. Make sure that the new songs still fit your vibe but will help you lower the tension. Giving your audience time to recover in-between increasingly intense climaxes will make for an amazing experience.
Add any puzzle pieces you might be missing
Remember the analogies of the story and the puzzle? Well now lets talk about the puzzle. At the end of the day, it is always technically possible to transition from one track to any other track, but not all transitions are created equal. Large changes in key, BPM, or genre might force you to use a simple “echo out and then press play“ transition which can take your audience out of the experience if used too frequently. Personally, I like to use as many smooth transitions as possible in my mixes while still giving myself the option to use a few harsher transitions if it fits the mood. To give myself more opportunities to discover great smooth transitions (when practicing in the next few steps), I take this time to add a few extra tracks to the list which bridge gaps in BPM and key.
As an example, lets say that you have a song that you’d really like to play with a BPM/key of 120/7A and another song with a BPM/key of 128/9A. To make this transition easier, add a few songs in-between these tracks which have BPMs of 120-128 and keys of 7A, 8A, and 9A. Its sometimes hard to know which songs will have great points for transitioning before practicing, so give yourself a few options before eventually cutting down the total number of songs in later steps.
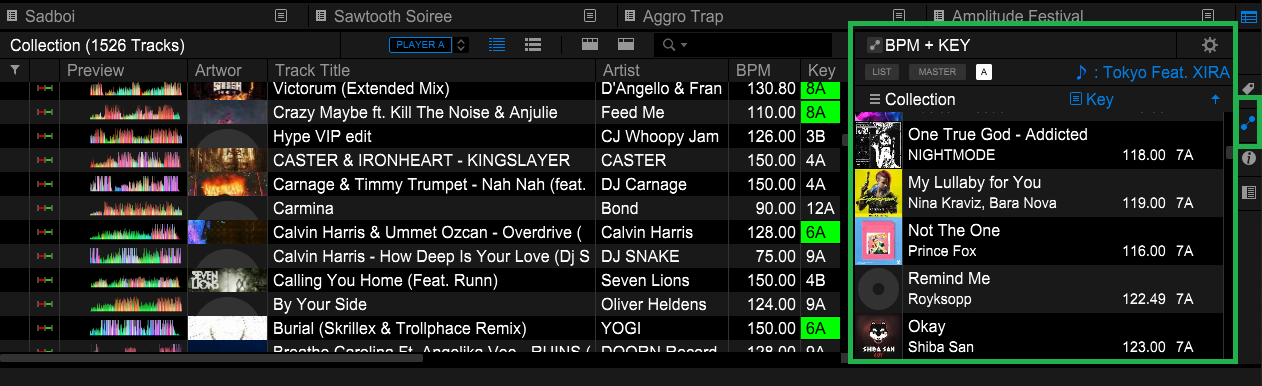
To make this step easier, Rekordbox has an awesome feature called “related tracks” (highlighted in green in the image above). A helpful tutorial on related tracks can be found here and there quite a few different ways to use the feature, but the most common way is to search your entire collection and filter for tracks within a certain BPM range and key range around a track of your choice. This is really great and can often dramatically simplify the act of finding the right track for the right place in your mix.
Adjust the beat grid and add cue points
Just as not everyone labels their music, not everyone uses cue points. For folks with great memory there is no need, but for me I find cue points to be an especially valuable tool. Adding cue points can take a bit of time and it doesn’t help with sorting music, so while I have labeled all of the tracks in my collection I’ll only add cue points to tracks that I think I might play in my next mix. So, once you’ve got a list of tracks you’d like to practice transitions on lets get to setting cue points!
The primary goal when setting cue points is to put visual indicators on specific parts of the song which you think would lend themselves well to transitioning. If both of the two songs you’re transitioning between have lots of complexity (intense synths, drums, or vocals) then the listener will feel overwhelmed if you fade between them. Thankfully, as you learned earlier, songs are constructed from phrases (typically with a standard 8 bar length) which each have certain properties. While every song is different, it is typical for songs to have most of their complexity reserved to the drop or chorus of the song, which leaves other phrases like the introduction, buildup, breakdown, and outro as good potential opportunities for fading between songs. So, lets identify where these phrases are in the song and then set our cue points!
In the image below I’ve shown what a track looks like when its filled out with all of the cue points I use in my system (Phil Harris’ system). Each cue point is color coded as well which helps me immediately remember what the points mean even if I haven’t listened to the song in a long time. The orange cue point is for the start of the song and the green cue point is for the start of the first drop. Each red cue point represents the start of an 8 bar phrase which I expect to be especially good for transitioning (either into or out of this song). When choosing which 8 bar phrases to put a red cue point on, I’ll typically start with 8 bars before the first drop, 8 bars before the end of the song, and then the least complex 8 bars in-between the first and the second drop. Each blue cue point is simply 8 bars before the upcoming red cue point. When transitioning between tracks with this system I’ll typically set up the new track to start at a blue cue point, and then press play when the blue cue points on each track are aligned. This gives me 8 bars of extra time to beatmatch in-between pressing play and fading in the next track.
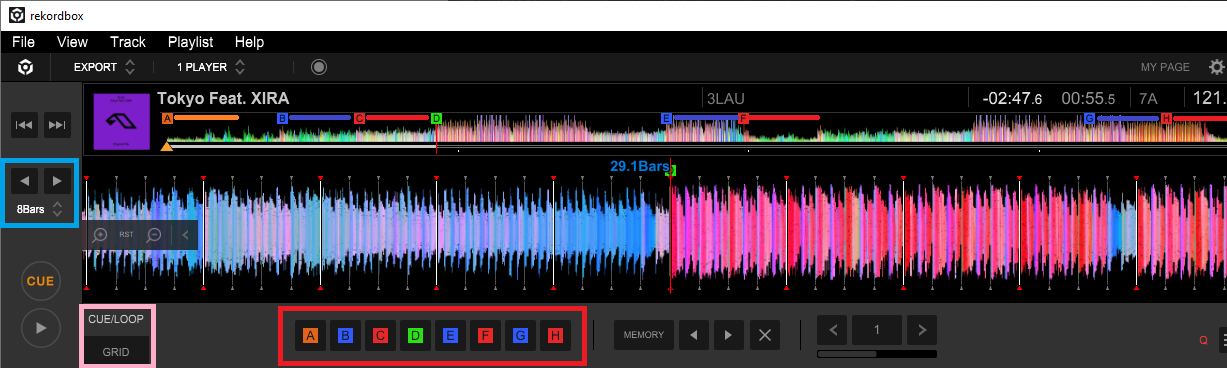
To start setting your own cue points, put your Rekordbox in export mode and set your beat jump value to be 8 bars. I’ve drawn a light blue box in the image below to highlight where you can set your beat jump. The arrows in the light blue box can be clicked to jump forward or back in the track by the amount of time shown below. Ok, now set each cue point one by one! I’ve written it out in a few convenient steps below:
Find the start of the drop. This is a great place to start since the start of the drop is the easiest place to check if your beat grid is aligned properly or not. You should see that just like the image above, the start of the drop should be aligned with the red arrows on the beat grid, which indicate the start of each bar. If this isn’t true, you can click on grid (highlighted by the pink box in the image above) to adjust the grid placement. Once you’ve verified your grid is aligned, place a green cue point on D (by clicking on D as shown in the red box) at the start of the first drop.
Jump back by 8 bars (left arrow in light blue box) and place a red cue point in C. You can change the color of cue points by right clicking.
Jump back another 8 bars and set a blue cue point on B.
For cue point A, place an orange cue point at the start of the first measure of the song.
Go to the end of the last bar of the song. Jump back 8 bars and place a red cue point in H.
Jump back another 8 bars and place a blue cue point in G.
Find the simplest 8 bars in-between the two (or more) drops. Place a red cue point in F at the start of this 8 bars.
Jump back 8 bars and place a blue cue point in E.
Export your playlist to USB
If you use CDJs or an all-in-one DJ system, export your playlist to USB so you can load you music. For a video explaining how, take a look here. If you’re on Windows, you may find this guide helpful as you’ll need FAT32 format but will likely have a USB which is larger than 32 GB.
Experiment with transitions!
You will need a DJ controller for this step. Start going down your set list and experiment with fade transitions, drop swaps, and all kinds of different transitions to see what you like best. Feel free to get creative! Use loops to extend certain parts of the song for easier transitioning, or fill empty space within the transition with noise effects. Have some fun with it! You can keep track of what transitions you like with a notepad or spreadsheet.
Finalize your set list and transitions
Once you have groups of songs that you really like the transitions between, you can combine these groups and create your final set list! Remember that you will want to tell your story with building and releasing tension, so keep this in mind when making your final decisions. Also, your total set time will need to match whatever you set out to have as your goal, so make sure to practice your full set from beginning to end to know your total set time. You may need to remove or add songs to get to the right time. Lastly, if you are playing live on a different set of hardware (for example CDJs) you will need to make sure that your cue points will work with that hardware. For example, some old CDJs only allow 3 cue points, so you will need to remove additional cue points before exporting if you want them to show up. Thankfully you really only need 2 (one for when you transition in and one when you transition out). I still like starting with more cue points though since it gives you many options when finding your favorite transition between tracks.
Play and/or record your mix!
Time to perform. Enjoy the ride! If the audience sees that you are having fun, then they will feel like they can have fun with it too :)
That’s all there is to it! Thank you for reading, I hope you found this helpful. If you have any questions then feel free to add them below, and if you’d like to hear some of the mixes that I’ve made you can check out my Soundcloud profile at this link.